Shadowrocket
Setup Guide
Start with the server details you already have, then import them, choose a mode, connect, and verify. First establish a connection you can check, then adjust rules and automatic connection settings.
- 01 Add
- 02 Choose a mode
- 03 Connect
- 04 Verify
- 05 Troubleshoot
Home → Add Server
Add a server or import an existing subscription
After opening Shadowrocket, stay on Home and do not turn on the switch at the top yet. First identify what information you have: a subscription URL retrieves a set of server entries that can be updated; an individual share link usually represents one server; separate text fields such as Host, Port, and Password are for manual entry. Use the appropriate method for each type of information. Do not paste a subscription URL into Host or enter an entire share link as a Password.
Existing subscription: use Subscribe
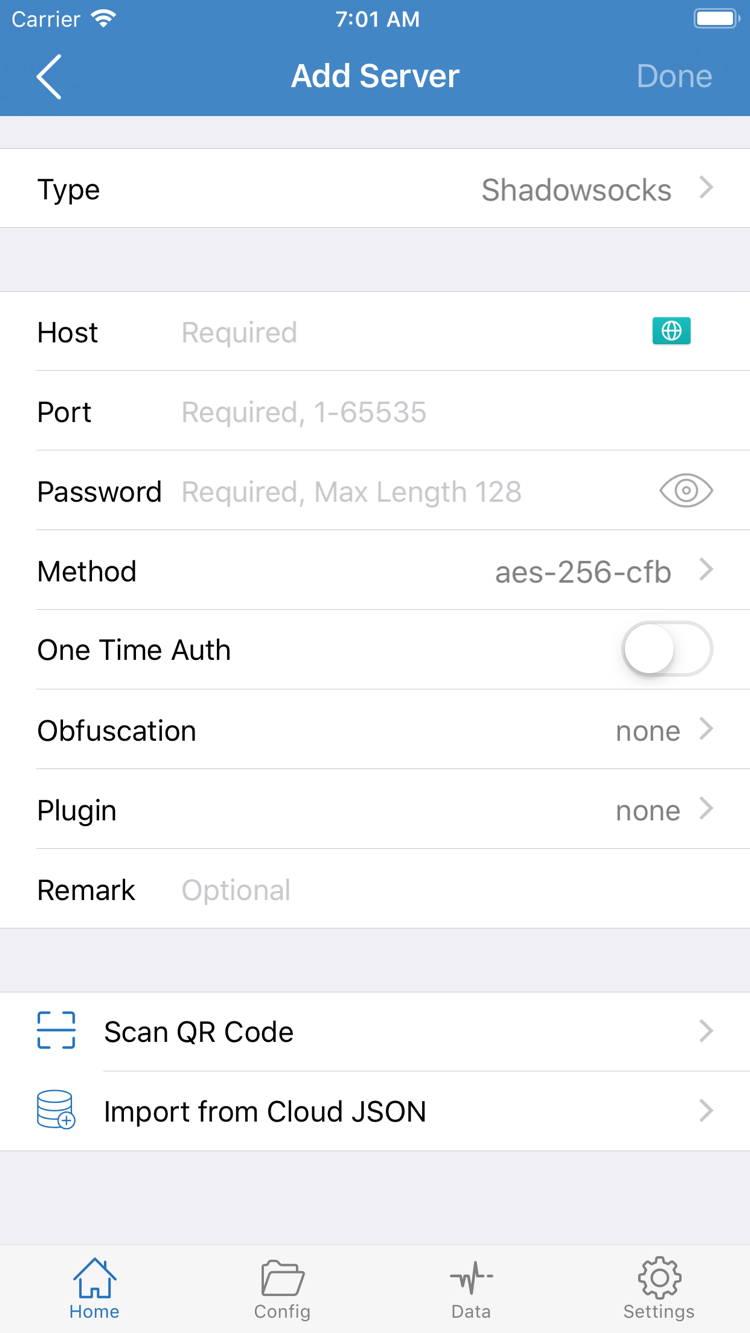
Tap the add button in the upper-right corner of Home to open Add Server. Select Subscribe under Type, enter your subscription URL and an optional label, then save. Depending on the layout, subscriptions may appear as a separate entry point; use the Subscribe option shown in the app. Paste the complete URL, including parameters after the question mark. Do not copy explanatory text, spaces, or line breaks that may accompany it in a message.
After saving, return to Home and wait for the entries to load. If no servers appear, use the subscription's update action, then check the network and whether the URL is valid. Import is complete when selectable entries appear under SERVER. Seeing the subscription name does not mean its contents were retrieved successfully; an expired URL, unsupported content format, or failed request may leave an empty group. Do not keep adding the same URL to fix an empty group. First check the update result for the original entry.
Manual entry: match each field to the server details
If you have individual settings, select the protocol specified in the server details under Type in Add Server, then enter Host and Port. The screenshot's Password and Method fields apply to the selected type; authentication and transport fields vary with other protocols. Host is usually a domain name or IP address, without a webpage path. Enter the port provided by the server. Fill in Password, Method, and TLS and transport settings as specified; do not substitute values just because their names look similar.
If you have a QR code, scan it using Scan QR Code. For a share link, confirm the clipboard import prompt shown by the app and check the parsed type and address. Import from Cloud JSON is for configuration content in the corresponding format, not a general-purpose entry point for any subscription URL. After importing, add a label that helps you recognize the server, then return to Home. Select one specific entry to test; do not organize multiple groups at the same time.
Check: An entry appears under SERVER, and one server is selected. For subscription updates, bulk organization, and backups, continue to the server management guide. For now, proceed to choose a traffic mode.
Global Routing → Config / Proxy / Direct
Choose a mode and confirm Config
After adding a server, specify which traffic should use it. Return to Home and tap Global Routing to see the current mode. For this initial setup, distinguish the three options: Config, Proxy, and Direct. If the interface also shows Scene, leave it until after verifying the basic connection. Avoid changing the mode, scene, and automatic connection conditions all at once; otherwise, it will be difficult to tell which change caused a problem.
Config: route traffic according to configuration rules
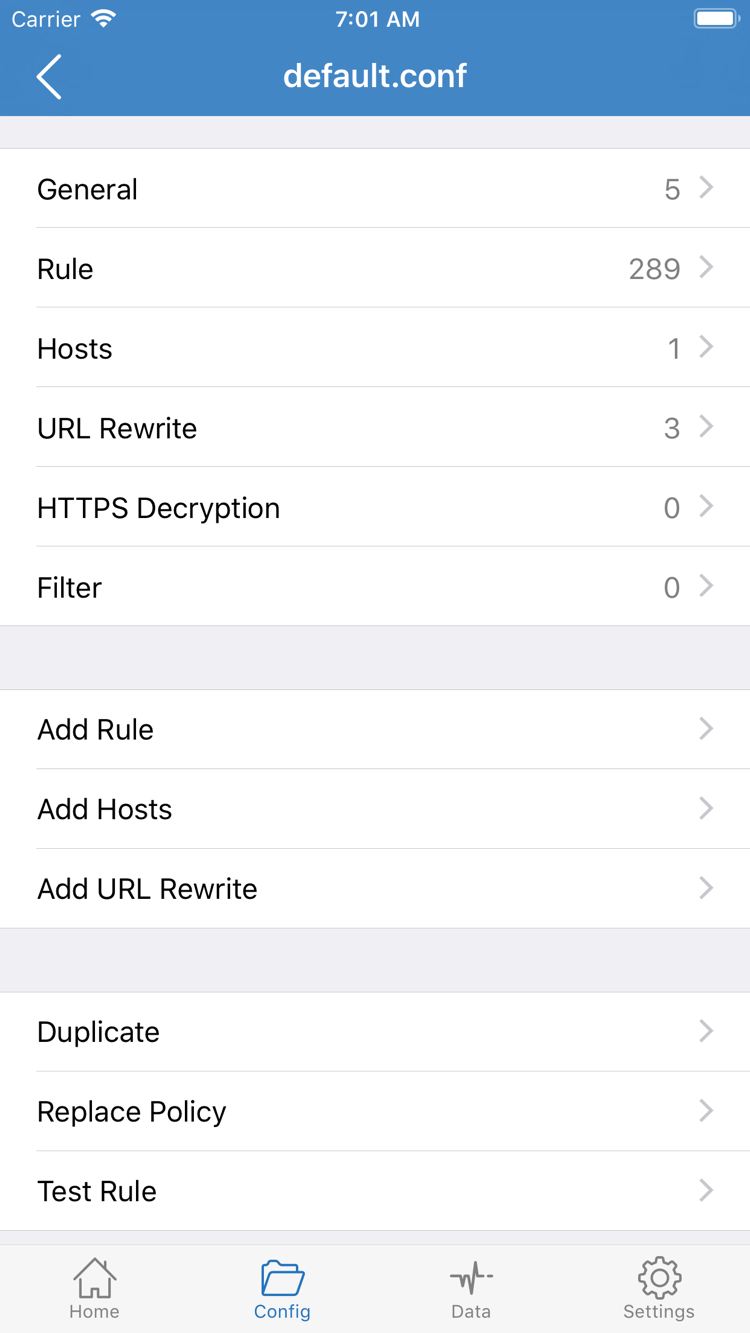
Config processes requests according to the rules in the current configuration; it does not mean that every request goes through the selected server. Open the Config tab at the bottom and confirm that the configuration you want is selected. Open the configuration to view sections such as General, Rule, Hosts, URL Rewrite, and HTTPS Decryption. The official screenshot shows the configuration editor so you can identify these sections; it is not the Global Routing mode selector.
For your first setup, review the rules in Rule and the final handling method, but do not make bulk changes yet. Rules are matched from top to bottom, and the first matching rule determines the route for a request. PROXY, DIRECT, and REJECT represent different outcomes. Add Rule adds a rule, but adding one does not guarantee it will take effect; check whether an earlier rule matches first. This guide does not require enabling HTTPS Decryption or setting up decryption for a basic connection.
Proxy and Direct: understand what each mode tests
Proxy sends traffic handled by the client through the selected proxy route. It can help reduce the effect of rule-related factors while troubleshooting, but it will not fix a server address, authentication, or transport setting. Direct connects directly and can help confirm whether the local network and destination are accessible. Opening a webpage in Direct does not prove the proxy server works. After changing modes, make a new request instead of relying on a page that was already open.
If you have a configuration whose purpose you understand, select Config to continue. To first check basic server connectivity, you can temporarily use Proxy for the connection and access tests below, then return to Config after verification. Note the mode before switching so you can restore it afterward. See the glossary for details about rule keywords, DNS, and policies; you do not need to learn every setting before your first connection.
Check: You know whether the current mode is Config, Proxy, or Direct. If using Config, you know which configuration is selected. Next, turn on the connection switch.
Home → Connection switch → System authorization
Turn on the switch and allow the VPN configuration
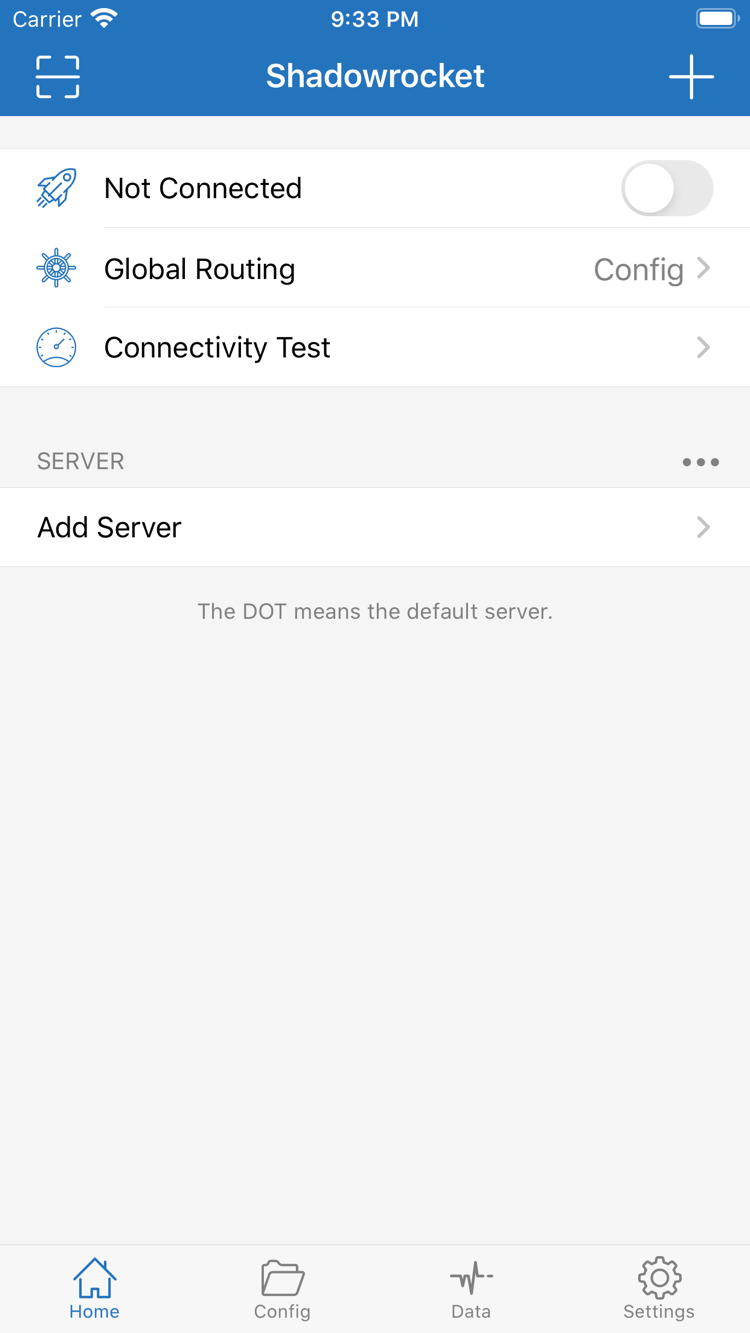
Return to Home and check the selected server and Global Routing again. If the top of the screen shows Not Connected, the client has not established a connection. Tap the switch at the top to connect. The first time, the system will usually prompt you to add a VPN configuration. This system prompt allows Shadowrocket to create the VPN configuration needed to handle network traffic. It does not add a subscription or replace the server details you entered earlier.
Confirm the app shown in the prompt, choose Allow, and complete device passcode or biometric verification as required by the system. Then return to Shadowrocket and check whether the status at the top has changed. If you previously denied authorization, try connecting again in the app. If the connection still cannot be established, check the system VPN settings for a Shadowrocket configuration. The settings path and prompt wording may vary by system version; follow what appears on your device.
Authorization only allows the client to handle the relevant traffic; it does not mean the remote server can forward it successfully. Even if the top switch stays on, server authentication failures, DNS issues, or rule blocking can still prevent webpages from loading. Do not stop after turning on the switch; verify the connection in the next step. Whether a VPN indicator stays visible in the status bar depends on the device interface, so do not rely on a single icon.
If the switch turns off immediately or remains in the connecting state for a long time, note the full message shown. Check whether another VPN is connecting in the system to avoid two connections repeatedly competing for the same state. Do not delete all network configurations. If you need to recreate Shadowrocket's system VPN configuration, first stop the connection and confirm the server details are still in the app. Change only the corresponding configuration, then return to the app and authorize again.
For the first connection, keep the current Wi-Fi or cellular network unchanged and leave On Demand disabled for now. This makes it easier to tell whether the manual connection failed or automatic connection conditions affected the result after a network change. Once system authorization is complete and the switch stays on, continue with Connectivity Test and a real access test. There is no need to reinstall the app.
Check: System authorization is complete, and the connection status on Home has changed. Next, verify whether being connected also means the destination is accessible.
Connectivity Test → Real-world access → Route check
Check test results and real-world access
Tap Connectivity Test on Home, wait for it to finish, and check for a response or error message. The result reflects the current test method, test destination, and network conditions; it does not mean every website or app will work. A response for one entry does not necessarily confirm that its authentication, DNS, transport, and access to your destination are all working. Consider the test result together with your next real request rather than choosing the entry with the lowest number and stopping there.
Next, open a website or app you normally use, refresh the page, or make a new request. First confirm that a regular webpage loads, then check the destination you need to access. Scrolling through a page opened before switching modes may show cached content and make things appear normal. An app with an ongoing session may also keep using an old connection after a mode change. If needed, reopen the destination app to make sure you are checking a request made after the switch.
With Config, different destinations on the same device may use different routes; this is expected when rules split traffic. To check the route, review the available request history or diagnostic information in the app and confirm the destination, matching rule, and final handling method. Do not assume that a page went through the proxy just because it opened. If a destination works temporarily in Proxy but fails in Config, focus the next check on the configuration, rules, and DNS rather than immediately re-entering all server details.
After successful verification, return to the mode you intend to use day to day and visit the destination again. Then stop the connection and confirm the device can still use the local network; reconnect and check that the result is repeatable. If you later need to switch between Wi-Fi and cellular, change one network at a time and repeat the test. Recording the network, server label, mode, test destination, and result is more useful for later checks than noting only that the switch was on.
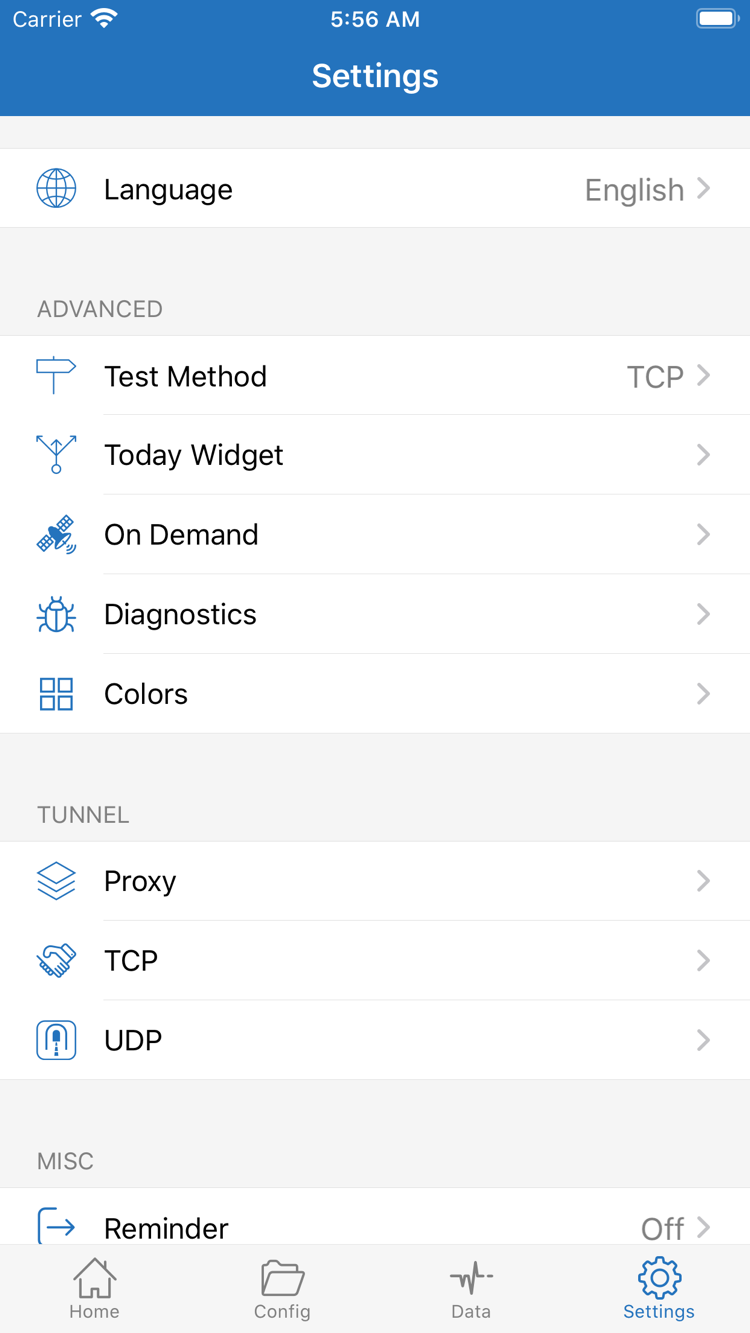
Settings → Test Method / Diagnostics
Check settings based on where the failure occurs
When something fails, keep the current server and configuration and avoid changing several switches at once. The most useful order is to start with the local network, then check the server, mode, rules, and DNS, and finally the system connection status. After changing one item, make a new request to the same destination. This links each change to a result, helping you determine whether it fixed the problem and restore the previous setting if it did not.
No entries after import, or the server keeps failing
If a subscription is empty, first confirm that the device can access the internet. Then check whether the URL is complete and still valid, and whether its response uses a format the client can recognize. Do not show URL parameters in public screenshots. For manually added entries, check Type, Host, Port, Password, Method, and any TLS or transport fields specified in the server details. A timeout, authentication failure, and content parsing error are different issues; note the original error before deciding what to try next.
Test results differ from webpage access
Open Settings and check Test Method. Different methods check different network layers. One failed test does not prove that all real requests will fail, and a test response does not guarantee that a destination is accessible. If needed, use Diagnostics to review relevant diagnostic information and consider the network and destination where the failure occurred. After adjusting test settings, compare results with the same server as before to avoid confusion from changing servers at the same time.
Proxy works, but Config does not
First confirm that the intended configuration is selected in Config. Then check whether the destination matched DIRECT or REJECT, or whether an earlier rule took precedence over a later one. If access by domain name fails while other requests work, check whether the current DNS settings or Hosts entries in the configuration affect resolution. Do not treat arbitrary DNS changes as a universal fix. Keep the original value, understand the reason for a change, and test the same domain afterward.
Connection drops after a network change, or the switch keeps changing
Return to Settings and check whether On Demand is configured. For initial troubleshooting, temporarily disable automatic connection conditions and test a manual connection on a fixed network. Once stable, configure behavior for Wi-Fi and cellular separately. If another VPN is active in the system, stop the connection you do not need. If the problem continues, record the system prompt and relevant Diagnostics errors; do not widen the problem by repeatedly deleting all configurations.
When preparing information for support, include only the device system, network type, mode, steps taken, and error text with sensitive details removed. Hide complete subscription URLs, Passwords, QR codes, and share links containing authentication information. For more detailed update, delete, and backup steps, see the server management guide. For common authorization and network issues, browse the FAQ by symptom.
After troubleshooting: Restore any temporarily changed mode, confirm the selected server and configuration, and test the same destination again. Keep settings you have verified, then add only one new feature at a time.